
Now we all love the idea of being able to stream media from one place in the world to another. The ability to sit in our homes switch on a smart TV, console, tablet or smart phone and watch whatever we feel like. Be it from Netflix, SkyGo, Amazon Instant Video or another streaming service. To be honest there isn’t much that rivals it. However it is nice on occasion to be able to access and stream media from your very own home. This could be home videos, digital film downloads or pictures and music. All this without relying on a decent broadband connection and all for free!
Having not till recently had a large enough bandwidth to support streaming media such as films over the internet. I looked at various ways to stream media to my devices in my own home. The main way of doing this is through a DLNA media server. DLNA stands for Digital Living Network Alliance. DLNA devices use UPnP (Universal Plug and Play) to communicate. This allows media content to be shared with devices regardless of there make or model, providing they are DLNA compliant. Most major tech companies are signed up which means that the majority of devices are compatible. Oh, except Apple of course . . .
To do this you of course need a network, it doesn’t have to be anything special just allow your devices to communicate with each other. Be it wired or wirelessly. There are a few ways to share media with DLNA. For example Windows Media Player 11 and onwards can be used to share media that is on your computer with other DLNA devices. This is done by turning on media streaming. This will allow other devices on the network to access media in your library. The other way is to install a piece of software that turns a computer into a DLNA media server. This is essentially the same idea as Windows Media Player but allows you to install it on any supported machine and have a permanent place for all your content. This is the idea I went for.
First of all you need to find some DLNA media server software. There are a few to choose from but the top of the list and the one I use is called Serviio. I’ve not found anything simpler but effective then this piece of software. It’s free and it’s supported on Windows, Mac, and Linux and because it’s Java based some NAS devices. It also has a pro version. The pro version allows you to stream your media through a web browser. This is handy for any devices which don’t support DLNA. The free version comes with a 15 day free trial, after that you lose the ability to stream through a web browser. However if you do grow to like this feature and find it useful you can buy a pro licence for $25. This is a one off purchase and covers you for every update in that major version.
I used one of my Windows servers as my host for Serviio. This is running Windows Server 2012 Standard. This software doesn’t have to be installed on a server. You could use your home PC if you wanted. But I wanted somewhere I could store a large amount of media files and not have to worry. This also means I can access my media server whenever as the server will always be powered on.
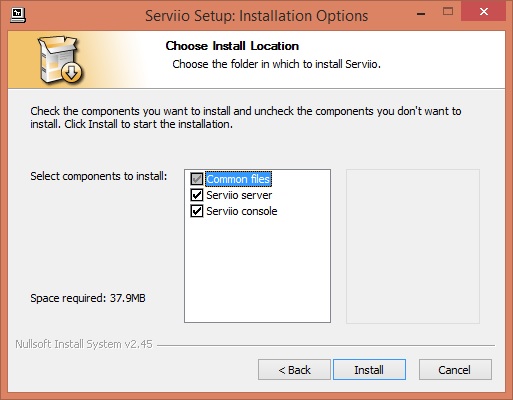
Once you have downloaded your required version run the install. Serviio requires Java version 6 to run. If it isn’t already installed on your machine the installer will download and install a copy for you. Select both the Serviio Server and Serviio Console and click Install.
 Once this has installed you can open the Serviio Console. This will allow you to configure your media server.
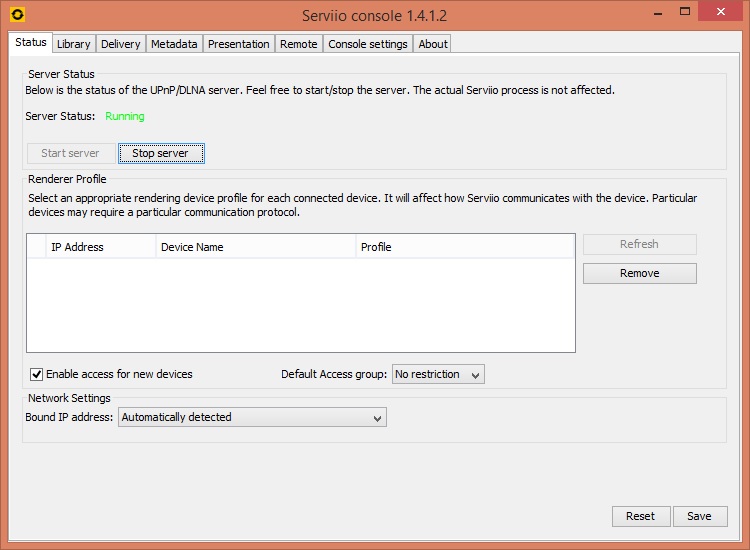 At the moment the Serviio service is installed, running and pretty much ready to go! All you have to do is configure a few settings. The first thing is to tell it what media you would like to share. If you click the Library tab you can add paths to where your media is stored. The best way to do this is to have your various types of media split up. This helps with organisation. You can see I have split music, pictures and video into 3 different places. To add these folders you need to click ‘Add Local. . .’ and add them individually.
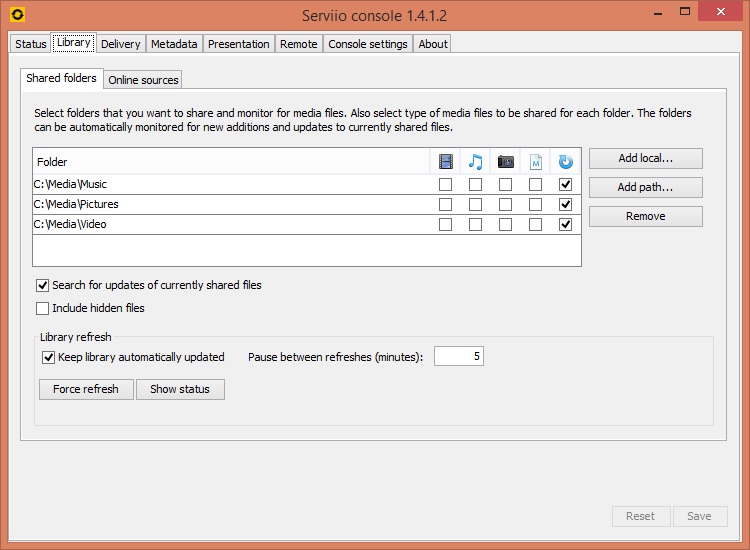 Once you have added the paths to your media you need to specify what is in these folders. There are 5 tick boxes, from left to right its video, music, pictures, metadata and update. For the path which has video tick the video box and for music tick the music both etc. The metadata box will get ticked automatically when you tick video, this means it will download a description of the video if it can find one. For example if you put a copy of a film in here it will find a description of the film, if it can. The last box is auto update. This means when you add new media to the folder it will pick it up automatically. See below an example of how it should look.
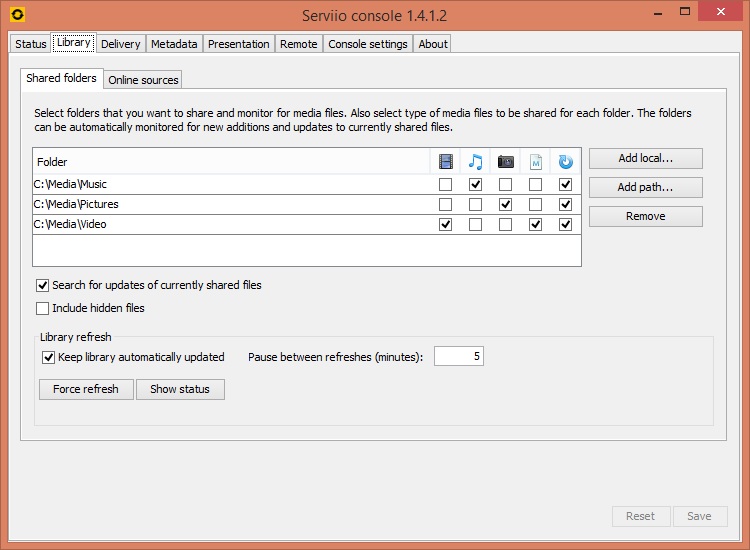 You can also click ‘Add path. . .’ which will allow you to add a UNC path to a share on your network. This works the same as add local. The last point is to make sure ‘Keep Library automatically updated’ is ticked. This will mean when you add new media to the folders it will be automatically available without you having to manually refresh. You can also set the interval for the refresh and also force a refresh if you need to.
Once this is all done your media server is ready and your content is available over the network. Any DLNA client on the same network as your server will be able to stream content from it. For example if I log on to my Xbox 360 and go to the media player on the menu I can see my server and play content from it. Windows 8 and 8.1 also has a build in DLNA client. If you go to ‘This PC’ on Windows 8 the server will be displayed under ‘Network Locations’.
 Usually this will be picked up and displayed automatically. If it’s not you can click ‘Access media’ at the top and select your Serviio server from the list.
(If you can’t see your media server from any device I would check your firewall setting on your media server. Depending on the operating system you are using you might find the port is blocked. Please see here for a list of FAQ’s and which ports need to be open on your firewall.)
If you now look back at your console under Status you will see that any device which has picked up and contacted the media server will be displayed.
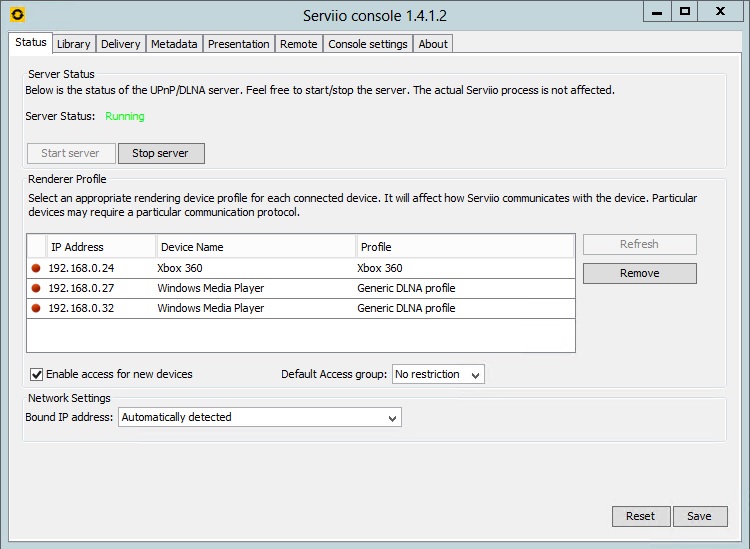 The colour of the dot will indicate whether the device is active. You can also see the devices IP address, device name and its profile. The profile given to a device allows the media server to know what file formats are supported on the device. The server will automatically choose a profile if it can identify the device like it has for the Xbox 360. If a device supports all media or it can’t identify the device it will be given a ‘Generic DLNA Profile’. A devices profile can be selected manually by clicking under the heading ‘Profile’ on the desired device. With profiles the media server can identify when a device is trying to access a file it can’t read. For example the Xbox doesn’t support .mkv video files. This allows the media server to transcode the file before it is sent. Basically the server will convert the file into a readable format and then sent it to the device which requested it. You can see this option under the Delivery tab.
 This is enabled by default and is a brilliant way of allowing all devices access to all media types. However transcoding takes a lot of system resources. If you plan on using it you need a fairly powerful machine to be able to keep up. If you don’t you will find your videos spend a lot of time buffering and juddering. Not ideal!
The last thing to look at on this console is the Remote tab. This is where you configure setting that will allow you to access your media content through a web browser. You need to set a password to start with and if you like you can change the preferred quality.
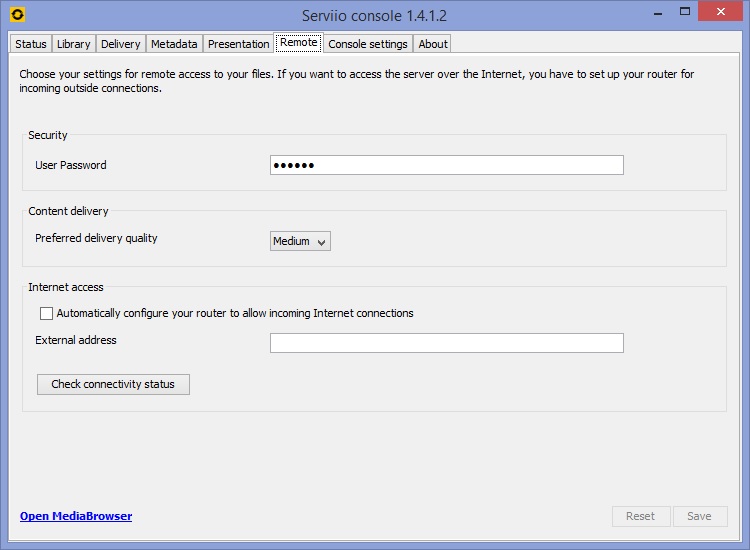 At the bottom there is a link called ‘Open MediaBrowser’. This will take you to the web paged that you can use to access your media. Once you put in your password you specified earlier you can select what content you want to access.

 This is very useful to some and allows you to access your media on any device with a web browser. This can also be setup so that you can access this page from anywhere over the internet. This feature is available for 15 days with the free version, after that your need to buy a pro licence.
And that’s it! Your media server is ready to go. This will allow you to share your media content throughout your home.
There are a few optional settings I didn’t cover in this post such as restrictions. Which allow you to only allow access to devices you approve. The other is online sources, which allows you to add external live streams and web resources. However hopefully I will cover this in a later post.